Installing a 3.6L 996 Carrera Engine into a 2001 Boxster S
By Jim Hedderick
Background:
My 2001 Boxster S was autocrossed in stock class in SCCA events for more than 10 years (two drivers, 35+ events a year). I also competed in PCA time trials and track day/DE events for nearly 18 years. With newer and faster cars being built every year, the car was no longer competitive in SCCA stock class. About 4 years ago I started modifying it with no particular goal other than to make it more fun. Once I retired in 2015, I used what little free time I had the first few years to convert it into a dedicated track car.
Memorial day weekend 2018 I entered an SCCA Time Trial at MSR Houston. On my second run I performed a classic “money shift” selecting 2nd gear whenaiming for 4th at around 105mph. The engine spun up to over 10,000 rpm and was toast and the gearbox damaged. This engine had approximately 50,000 miles on it from new.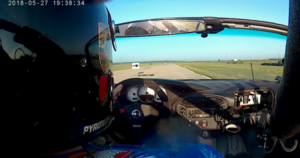
In this photo I am approaching the temporary speed bump in the straight away in 2nd gear, still doing nearly 100 mph with the tachometer needle buried at the maximum reading. This caused a fair bit of damage.
Understanding the Challenges, Available Online Resources, and Selecting a Path
This article is organized by subject rather than chronological order to hopefully make things a little easier to follow.
There is a step by step go-by on the Pelican Parts website that details a Boxster engine upgrade. The Wayne Dempsey/Pelican Parts article gives a summary of what engines can go into what Boxster/Cayman from their perspective. The step by step instructions for the exact conversion they did are relatively complete with one exception; there is NO detailed information on the electrical/computer/engine wiring modifications necessary.
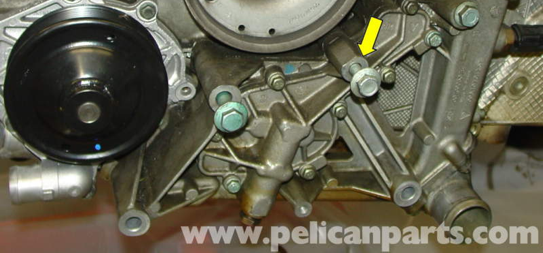
The Wayne Dempsey Pelican Parts article has many useful photos like this one showing how to install the Boxster motor mount onto his 3.4L factory rebuilt Carrera engine. I bought some of the needed parts from them as a “thank you” for providing these valuable resources for all enthusiasts.
 However Pelican Parts business is to sell parts and their article details only one possibility out of all the possible car/engine combinations. The conversion they did appears to be a “cost is not a consideration” project. They easily spent $30,000 in parts & software alone on their 3.4L engine conversion where I spent less than a third of that on my 3.6L conversion. They hint at what is practical and what is not in their article. The following is my take on the same subject based on my research. It may be useful but ultimately it is only one person’s opinion.
- They don’t talk much about transmissions in the Pelican Parts article but a Tiptronic transmission multiplies the electrical complexities and pitfalls. If you search the internet you will find stories about Boxster 996 engine conversions that were abandoned because they were unable to get the Tip to work with their new engine and VERY few successful examples.
- All conversions to 3.2L or larger Boxster or Carrera engine are going to require a 6-Speed Boxster S transmission, axles, uprights & hubs, and so on to handle the power & torque. The underlying message is the most cost effective engine upgrades will start with a Boxster S. The cost of drive train upgrades are not included in my estimate of what Wayne spent on the engine conversion portion.
- For 97-00 Boxsters the most viable options are 2.7 or 3.2 Boxster or 3.4 Carrera engines, however drivetrain upgrades will be needed for most of these options.
- The easiest upgrade for a 2001 Boxster S is a 99-01 3.4 Carrera engine. I installed a 3.6L VarioCam-Plus Carrera engine so I had to swap DME, other electrical parts, make wiring changes, and cut & fit a lot of things. For a street car 3.6L conversion either you would have to give up cruise control (not an issue for my track car) or swap ABS/PSM computers, instrument cluster, and modify wiring. If I were converting a street car I would have definately swapped in a 3.4L engine into a 2001, not the 3.6L.
- For 02-06 Boxsters, 99-01 3.4L Carrera engines are practically a drop in and work with the existing computer. A 3.6L VarioCam-Plus Carrera engine swap like mine is doable for a street car with a DME computer upgrade and some wiring changes because Porsche used the same CAN bus system in those Boxsters as the 02-04 Carreras.
- The VarioCamPlus Carrera engine swaps don’t become seamless until 2007 when Porsche finally introduced this technology and the DME 7.8 computer to the Cayman/Boxster line.
My Considerations and Decision:
- LN Engineering was having an inventory reduction sale on their rebuilt engines where they waved the core charge and cut the price by $2,000. A rebuilt 3.2L 250HP Boxster engine was $5,500. This is a killer deal for a street car as the mileage is reset to zero. However in my case, there was no performance gain but this became my base cost for comparison. (Without a sale, this would be $7,500 plus returning the core.)
- A 3.4L 99-01 Carrera engine is 295HP and is a relatively simple conversion. (LN Engineering did not have this engine on sale.) I found a few 80,000 mile range engines for sale for around $6-7,000. 150,000 examples were cheaper. The attraction here was I could keep my DME 7.2 computer and wiring. Relatively simple upgrade, very attractive cost, and a modest increase in performance.
- There are LN Engineering/Nickie 3.2L to 3.6L conversions that are a drop in and reuse all Boxster components. Though larger in displacement they optimistically develop only around 290hp. It is the smaller Boxster intake and exhaust systems that choke these engines down restricting how much power they develop. They sell for $15,000 so this was not an attractive option.
- 6L 2002+ 996 Carrera VarioCamPlus engines are 320hp and more plentiful ranging from $5,000 for high mileage examples to over $10,000 for ultra low mileage examples. However because they require computer, fuel system, and other upgrades, an additional $1,500 in parts is necessary compared to a 3.4L engine.
- A 997.1 Carrera S engine is the most desirable option but even high mileage examples were selling for $15,000 or more due to high demand.
- I ended up buying a 2003 3.6L Carrera engine with 59,000 miles from Viking Sjovall that had an upgraded LN Engineering IMS bearing. This cost me $3,800 more that the rebuilt 3.2L for a 70hp gain. It seemed to be a relatively inexpensive 70 HP gain and the right path for a competition car.
The downside to my choice is that there was virtually no information out there and a number of potential pitfalls. Some disaster conversion stories on the Web didn’t help. I really wasn’t sure how this would work out resulting in some lost sleep.
Removing the Engine/Transaxle
The Boxster service manual shows a Boxster engine being removed without a lift. It took a little more disassembly, but I had no issues performing this engine swap with the car only on jack stands. The only caveat is that I screwed two 4×4’s onto a piece of 2×12 for cribbing under two
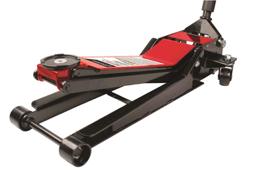
Harbor Freight aluminum jack stands. With the benefit of hindsight, I would have purchased the two items below before taking on this project. The first is a 24” lift jack for $190 on Amazon.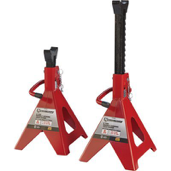 The second is a set of 24” rise double locking jack stands for $50 on Amazon. Though cribbing under standard jack stands can be done safely, these tools are better suited for the job and are safer. (I now own the jack and 4-24” jack stands.)
Start by removing all the under-trays except the very front ones, the inner rear fenders, exhaust, headers, rear bumper, all the suspension bracing, brake rotors, calipers, and axles. Follow the service manual instructions for disconnecting fuel, power steering, coolant, vacuum, and other lines for engine removal.
I purchased a 1000lb lift table from Harbor Freight and reversed the handle so that it folds down to the back. I used an old jack handle instead of the foot pedal and positioned this under the engine/transaxle. With a 4×4 piece to support the back of the transaxle I raised it up and then removed the motor and transaxle mounts. 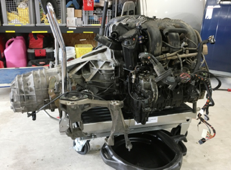 The manual says to disconnect the fuel lines and AC compressor as you lower the assembly a bit, which worked like a charm.
At this point, strip all of the remaining sub-frame parts and your Boxster will look like mine in the photo. Everything will clear and you can simply wheel out the combo engine and transaxle as in this picture.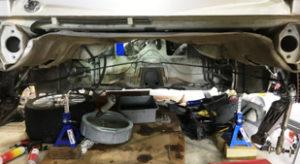 I had a rear 11” wide wheel under each side for safety in case the car fell off the jack stands.
At this point in the process, the extent of the damage to the transaxle was more evident. The picture on the left is the pressure plate. Power from the engine is normally transferred to the transaxle in the direction of the green arrow as if pulls on the drive straps. When I missed the shift, a tremendous amount of force was transmitted backwards through the drive straps in the direction of the red arrow. 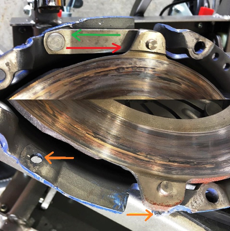 In the picture, the orange arrows show where two out of the three pairs of drive straps were ripped out of the pressure plate.
The right hand picture 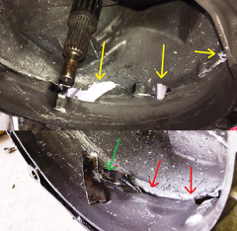 shows the damage flailing drive straps can do with the engine turning at 10,000 RPM. Note the two pressure plate drive straps sticking out of the bottom after they nearly cut the bell portion of the case in half.
I loaded up a transaxle I had with a broken ring gear and this broken one and drove non-stop to Colorado to have them combined into one good one. I made some expensive transaxle upgrade decisions once it was apart that are detailed later.
I purchased two 1000# Harbor Freight engine stands to make it easier to transfer parts from one to the other. A Harbor Freight $50 2000# chain hoist was used to move them from the lift table to the engine stands.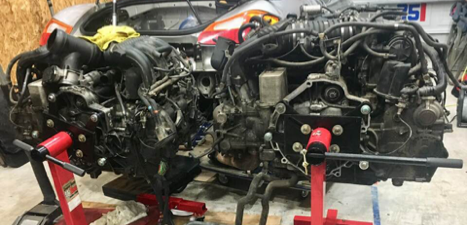
The 996 engine is on the right. Taking lots of pictures at every step of the disassembly is a really good idea.
Fuel System
Wayne Dempsey from Pelican Parts modified the Boxster fuel system to work with the Carrera Engine. I strongly recommend you DO NOT DO THIS. He mentions at the end that his approach may not have been ideal. I adapted the Boxster fuel delivery system to work with the existing 3.6L 996 Carrera fuel system.
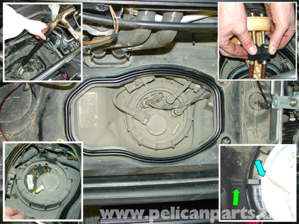
The article says to buy a late model fuel pump and sending unit and they all fit. This is wrong. Buy ONLY a later model Boxster/911 fuel pump. The later model sender units use an electrical connector that is not compatible with a 986. I bought a fuel pump from a 2009 Boxster on EBay. There is a Pelican Parts article on how to replace a fuel pump that has good pictures and instructions.
Here is an outline of what I did.
- Remove the battery tray exposing the top of the fuel tank. Disconnect the electrical and fuel line connections. The less fuel in the tank the better. (Good design to HAVE to remove the battery before opening the fuel tank. )
- A large screwdriver or chisel and hammer are used to take the very large nut off on top of the fuel tank.
- Reach down (with rubber gloves on) and turn the fuel pump CCW 1/8 of a turn and it along with the sending unit will lift out.
- The old pump will have a supply and return line on it. CAREFULLY disconnect from the fuel tank cap and cut the connectors off the old pump. Only the supply connector will be used with your new pump.
- I filled the return line bulkhead connector with red gasket maker silicone on both sides as it will not be used again.
- On the non-return pump CAREFULLY remove the supply connector and attach the supply connector from the old pump to the hose end. I prefer stepless single ear clamps to prevent leaks as it will be difficult to pull this back out later. The spade electrical connectors on the new pump plug into the old sender unit. Carefully install the new pump and old sender so as not to pull any electrical connectors loose.
- A 1/8 CW turn snaps the new pump into place. At this point you have two fuel filters as the new pumps have one built in. You can keep both or bypass the one under the car.
- Carefully reinstall the large nut, rubber seal, and hook up the supply and return connections.
You now have half of a 996 non-return fuel system. The good news is the 996 3.6L donor engine already has a non-return fuel system. In the engine compartment it is only a matter of adapting the Boxster fuel system to the Carrera engine. Here is what I did:
- The O.D. of the Boxster fuel line is 8mm. Using a tubing cutter I cut the Boxster fuel line at the center of the engine compartment. The I.D. of the Carrera fuel line is 10mm. There is a 10mm I.D. brass “Y” connector on the Carrera engine that runs on top of the intake plenums.
- This part is important: Most fuel line is rated for 50 PSI. The Porsche non-return fuel pump delivers 62 PSI. I bought 3/8” (10mm) and 5/16” (8mm) Fuel Injection 120 PSI rated fuel line on Amazon. I also bought a 10mm to 8mm brass hose barb reducer on Amazon. I made a big loop so as to avoid any kinks circling the intake plenums. This allowed me to hook up the fuel lines and then carefully raise the engine into place.
- For safety I used two clamps about 2” apart on the Boxster 8mm fuel line though probably one would have been enough. I had a vision of the fuel line coming off and shooting a stream of fuel behind where I sit.
None of the Boxster engine return fuel system components were transferred to the new engine. The 996 Carrera engine fuel rails, injectors, and all other components were left undisturbed and reused in their entirety as designed by Porsche.
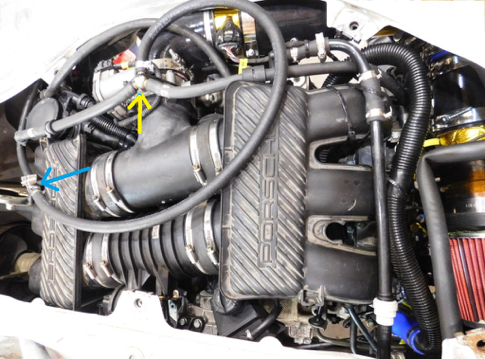 In this picture, the blue arrow shows the 10mm to 8mm reducer installed and the yellow arrow shows where I connected into the existing 3.6L fuel lines.
Pelican Parts has pictures and a technical article on replacing a fuel pump with excellent pictures like these.
Cooling System
This will be a short section as modifications here were unnecessary. I purchased a new water pump with a metal impeller and all new hoses to connect the engine to the chassis given my nearly 18 year old car. (Build date is October 2000)
A nugget from the Wayne Dempsey article was to use German style hose clamps. I did a little research and bought a variety in overlapping sizes. The worm drive on these clamps is protected from scraping and damaging the rubber hose. Much more reliable!
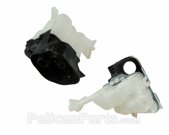 If your expansion tank has any appreciable age on it, this is the time to replace it. It will never be easier to replace than with the engine out of car.
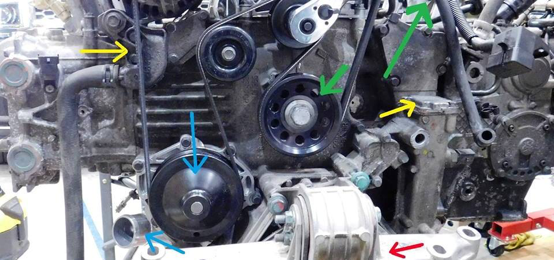
The Pelican Parts article details which cooling system parts have to be moved from the Boxster engine to the 996 Carrera engine. The yellow arrows show a couple of these that are unique to the Boxster.
Intake System
The approach Wayne Dempsey took on his 3.4L engine installation was reuse the Boxster air intake. While this is an option, the Boxster intake is 39% smaller in cross section than a 996 Carrera 3.6L intake. When he fired his engine up for the first time, it ran initially but then stalled. The computer thought it was getting way more air than it actually was and added too much fuel causing it to stall.
While it is called a mass air flow sensor, the MAF sensor uses the change in resistance of a heated wire that the airflow creates to imply air velocity and the computer calculates mass flow based on the cross sectional area of the tube that it is mounted in.
Wayne fixed this by paralleling a resistor onto the MAF sensor to compensate for the smaller cross section of the Boxster intake. While this works, the restricted airflow reduces the power of the larger engine, like breathing through a straw. Here is a photo of what he did. 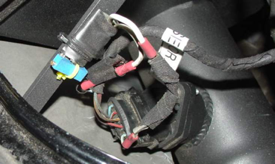 The rectangular green thing is the variable resistor used to trim the air/fuel ratio.
After reviewing Wayne’s approach, I quickly concluded that I did NOT want to restrict the airflow to my larger engine. The black aluminum tube above in which the Boxster MAF sensor is mounted is 3” in diameter. The equivalent section of the 996 airbox is 3.5” OD. The other issue is the Boxster MAF sensor is located 24” upstream of the throttle body and the 996 sensor is only about 7” away. Both of these differences confuse the 996 DME computer program.
My solution was to cut the sensor mounting tube out of a 996 airbox and fabricate an unrestricted 3.5” I.D. intake system. Different model year 996 airboxes have different designs but they all have a tube where the MAF sensor is mounted that can carefully be cut out and used. In this picture 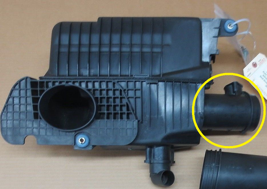 I circled the section of an airbox that can be used. In other designs they are buried deeper in the airbox and are more difficult to extract, but with patience it can be done.
Again Viking came to my rescue with an assortment of airboxes that he had collected over the years. I decided on the ugliest one as all I needed was the critical short section. I purchased an assortment of 3.5” silicone hoses, aluminum tubing, a 3.5” cone air filter, elbows, and turbo style hose clamps on EBay and Amazon. The throttle body is 74mm, 3.25” O.D. so one silicone elbow was a 3.5” to 3.25” reducing elbow.
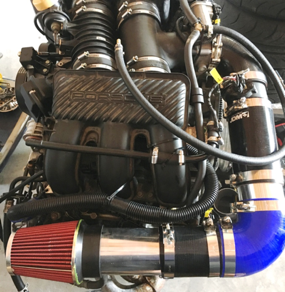 This next picture shows my first pass mock up. As you can see, the MAF sensor is in approximately the same distance from the throttle body as it is in a 996 airbox. I trimmed the first elbow in order tuck the intake tightly against the engine.
I then put some reference marks in the engine compartment, enlarged the hole in the aftermarket Boxster airbox to 3.5”, and test fit the mock up. 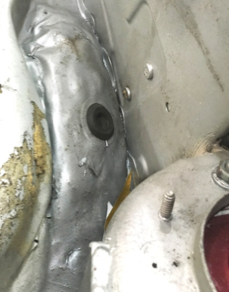 About 3/4” of additional clearance was needed so I had my son take a 4 lb. hammer into the engine compartment to “massage” the metal a bit to gain clearance. Not wanting to crawl under there twice, he hammered out almost 3” of clearance. On a street car, the smaller amount of massaging actually needed is easily hidden by the carpet.
Pictured below is the test fit into the engine compartment with some gold heat shielding on the metal & plastic parts. I eventually used less aluminum tubing and more silicone hose to reduce heat transfer.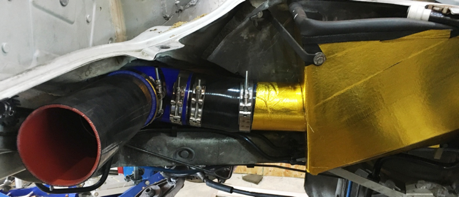
The final photo here is with everything in place. The engine started and ran great, the 996 engine DME 7.8 computer is seeing the same airflow signals it saw when the engine was installed in a 996. This custom design will not unnecessarily choke down the bigger engine airflow thus allowing it to develop full power. I will fine tune the fuel/air mixture and other parameters on a dynamometer in the next few months, but for now the engine is running great.
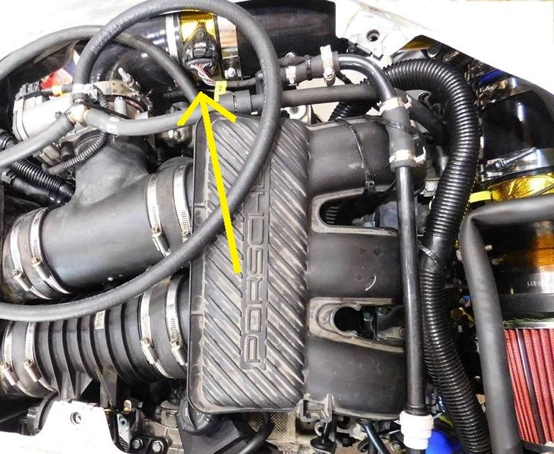
The MAF sensor tube (yellow arrow) is rotated 45 degrees so that it is under the engine cover where it clears easily.
Accessories & Vacuum Powered Systems
In this section I will detail the modifications made to the engine accessories. I made decisions based on my car being a dedicated track car. On a street car, some different decisions will be made.
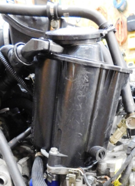 Because my car is a track car, I added the physically larger motorsports Air/Oil Separator. With sticky race tires, stock M96/M97 engine oil separators can easily be overwhelmed in long corners, especially left turns often damaging the MAF sensor and making a mess of the intake system.
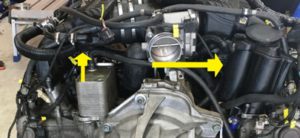 In the tight Boxster engine compartment, the 996 routing of the cylinder bank 2 AOS vent lines would not fit.
  I cut and fit Boxster and 996 vent lines to route them under the intake runners. For the one necessary splice I used a section of properly sized silicone hose.
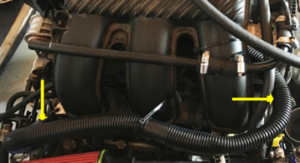
One downside of using this larger separator is that it occupies the space that is used in the Boxster to route the oil filler tube and dip stick. On my track car I retained the 996 oil filler tube and modified it to work on a track car. This would not be a viable option for a street car.
For the vacuum line powering the brake booster, the 996 intake manifolds do not have the port in the same location as the Boxster. Wayne Dempsey used some fuel line and hardware store brass fittings to route this line across the front of the engine. This area is VERY congested with the PS pump, A/C compressor, alternator, and so on. I chose to use the existing 996 manifold connection now on the back of the engine and route it along the driver side intake runners to where the Boxster connection was.
For vacuum service to an important system such as brakes, I used a hard line from an old brake booster line. I cut out a few straight and elbow sections and where a splice was needed, I butted the hard lines together before covering the splice with a rubber fuel line and single ear stepless clamps. This absolutely eliminates any possibility of a rubber line collapsing under vacuum as I couldn’t bring myself to use only a rubber line and hope for the best.
This is a simpler solution and there is plenty of room to route the lines here. The arrows in the next picture show where the tap goes into the 996 intake manifold and where it connects to the existing Boxster brake booster line. Simply grasp the end of the existing line and turn the flex line half of turn and it will line up perfectly.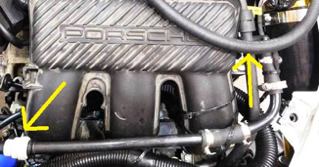
The A/C compressor is not in the way and can be reinstalled for a street car. For my track car, I used this opportunity to remove the compressor and all of the associated air conditioning lines and condensers. I already had an underdrive pulley installed as my engine lives almost exclusively at high rpm.
The green arrows in the picture show the missing ac compressor and underdrive pulley. A Bando 6PK1880B from Amazon fit perfect for my application but according to Viking other brand pulleys use a Bando 6PK1890B.
The idler pulleys were either replaced or rebuilt with new bearings. A new water pump and new thermostat are shown in the bottom left.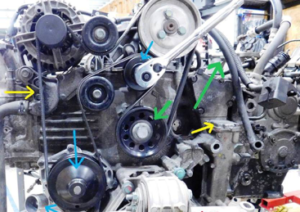
The secondary air injection (SAI) system injects fresh air into the exhaust system for approximately one minute after a cold start to fire the catalytic converters off more quickly to reduce emissions. My track car has long tube headers and no converters so I stripped this system out completely. I used some ¼” aluminum plate to blank off the injection ports and removed the SAI pump, solenoids, and lines. I reused the injection port gaskets with the blanking plates.
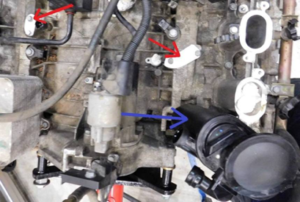 The red arrows in the picture shows the blanking plates. The blue arrow shows the Motorsports AOS mentioned previously.
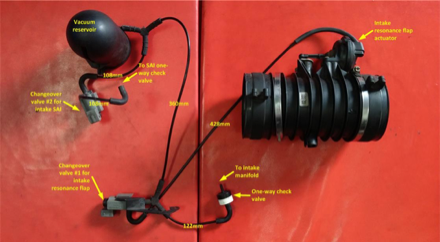
This is best illustration I found for the secondary air injection and resonance flapper vacuum connections vacuum lines that need to be hooked back up after transferring them onto the 3.6L engine.
Transmission & Clutch
This portion of the conversion is relatively straight forward. The standard Boxster S 6-speed gearbox can handle the extra power and torque of the 3.6L 996 engine. To make things fit it is simply a matter of fitting a Boxster flywheel and clutch assembly to the 996 engine and bolting up the Boxster transaxle.
The one obstacle is that with the taller 996 engine, the shift cables are not long enough. Fortunately aftermarket supplier Numeric manufactures longer 996 Cup style shift cable specifically for 986 Boxster 3.6L and 3.8L conversions. The boots where the cables pass through the firewall had to be slit to fit these larger cables. The yellow arrow shows the longer cables passing over the 3.6L engine.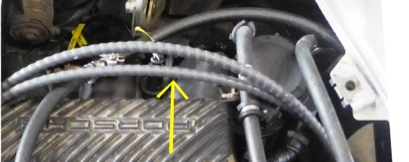
For my application I also upgraded to an all metal Numeric shifter and Rennsport riser & shift knob.
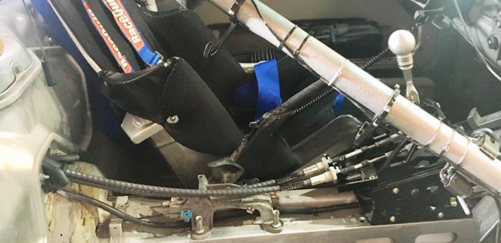 Given that my car is a dedicated autocross and track car, I had the transmission rebuilt and modified. Besides new bearings and seals, I had stronger 993 synchronizers, hardened and ground 2nd and 3rd gear sets, and an OS Giken limited slip differential installed and set up by a Porsche Gearbox specialist.
Electrical Modifications (Flying without a Net)
This is the part of the job that was the most intimidating as I was retrofitting VarioCam Plus (variable valve lift) engine technology into a wiring harness that was designed years before Porsche integrated this technology into the Boxster. Some of the challenges:
- The 996 engine wiring harness connects to the 911 body with two round multi-pin weatherproof connectors and through the car body wiring harness, it connects to the DME 7.8 computer. The 2001 Boxster engine wiring harness plugs directly to the DME 7.2 computer mounted in the trunk. The Boxster has three plugs that go to the engine wiring harness and two that go to the car body. The 911 computer pin assignments are not exclusively sorted in the same manner as the Boxster.
- A DME 7.8 computer had be fitted that is synchronized with the key fob and immobilizer with a program installed for a 2003 911 engine with a manual transmission.
- The wiring diagrams I had were a very early version of a 2001 Boxster, one of two sheets for a 2002 996 Carrera 2, and a DME 7.8 pin out diagram from a 2003 996 Carrera 4. I also found some bits and pieces of the second sheet diagram from a 2003 996 Carrera Tiptronic on the internet. These diagrams were translated to English by different individuals at different times and different English words are used to describe the same function. Some wires on my early version 2001 Boxster diagram still had the German words. In the end, only about 80% of the wires were clearly obvious as to where they should connect after 2-3 passes through the documentation. The remaining 20% took 90% of the time to research and in half a dozen instances, my best educated guess was the only option. I created a spreadsheet showing where each wire went to the 5 computer connectors in the 2001 Boxster versus where each wire had to go to the newer DME 7.8 996 computer.
- The Boxster wiring harness does not directly fit a newer 996 engine as a number of sensors and solenoids are in a different location of these newer “5-chain” engines versus the 2001 Boxster’s “6-chain” engine. Also new wires had to be added to the old Boxster wiring loom.
I took a “slow & careful” is faster approach to this job. First task was to disconnect each wire from the two engines and carefully label them. Second task was to unwrap the harness so that each wire could be run to the 996 engine location which in some cases, was at the opposite end. Some wires had to be spliced and lengthened. I used Solder Seal Heat Shrink Butt Wire Connector Terminals that are available in 4 sizes on Amazon.com. Most of the wires used the smallest size. These are weatherproof and solder the wires together for a very reliable connection.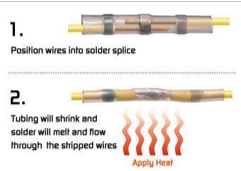
Once I had all of the existing Boxster wires connected to the 996 engine, I temporarily installed the engine in the car and connected it to the existing 2001 Boxster DME 7.2 computer. I did this to confirm the engine started and ran smoothly even though the intake valves would only be opening half way. This confirmed that the engine wiring harness was connected correctly to the 3.6.L engine and that the sensors & engine I purchased out of a wrecked car had no obvious electrical or mechanical issues.
Next task was to pull the engine back out and modify the wiring harness to work with a DME 7.8 computer. 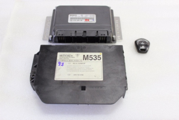 Wayne Dempsey sourced a new DME 7.8 Computer ($3,200) and a custom program for Boxster conversions from Softronics for another $1400. He then paid a Porsche dealer an unknown amount of money to marry his computer to his existing immobilizer and keyfob. This approximately $5,000 expenditure deserved some research to identify more cost effective alternatives!!
- The “ECU Doctor” sells used DME 7.8’s modified to work without an immobilizer with a 5 year warranty for $1,500.
- The “911 Doctor” on EBay had a DME 7.8, immobilizer, and key fob from a 2002 996 (Close enough to a 2003) with a manual transmission that was guaranteed to work for $750. I chose this riskier but cheaper path.
You will need to source and extra computer connector from a wrecked Boxster (either connector #1 or #5) for a couple extra pins. 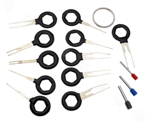 The specialty tools needed to modify the electrical connectors cost $8 on EBay and along with some insulated marine grade spade connectors,
 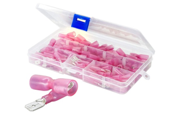 I was ready to dive in.
Using my spreadsheet, I carefully removed each pin that had to be moved or was not used from the connector and marked the wire. I then reinserted pins into their new location. In 5 cases a spade connector had to be used as the wire moved to a connector that was part of the car body loom. 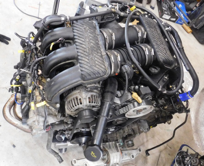 Finally I cut out any wires from the 996 engine harness that did not exist in the Boxster wiring harness and spliced them into connector pins.
Leaving all the wires loose, I again temporarily installed the engine in the car along with the new immobilizer, computer, and key fob with my original key blank installed. 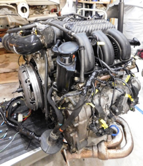 I started the engine and everything ran and worked with the new computer. I connected up my Durametric tool to my “new” car to check that the variable valve lift function was working along with everything else.
Confident that everything was working properly, 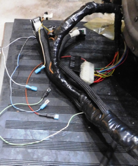 I pulled the engine back out and dressed the wiring loom using friction tape to weather proof it and #33 electrical tape and tie wraps to dress it. For the first time in 6 weeks, I slept well that night.
Putting it All Together
It all goes back together the way it came apart, mostly. For me it seems easier to fit the transaxle at this point and lift everything up into the engine bay at once. I snapped this picture just before I lifted it in place. Installing the suspension, axles, shift linkage, exhaust, covers, and the rest is time consuming, but not difficult.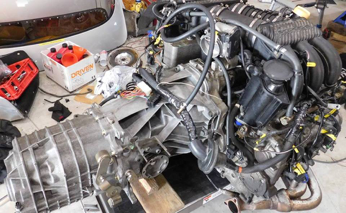
One of the first things I sourced off EBay was a taller engine cover from a 2009 Cayman.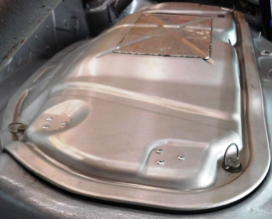 If you are building a street car you will need to source the carpet pieces for your particular car as well. The 2009 and later cars have the taller engine components so this is the easiest way to get things to fit. On the Pelican Parts project car they spaced the engine mount down 1” to clear the taller 996 components and used the original engine cover. I started out spacing my engine down ¾” since I had the taller engine cover.
Immediately I found that the resonance flapper valve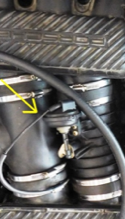 was hitting the top of the engine compartment. I was able to rotate the housing about 150 degrees where it now resides under taller 2009 cover. Also note that I left the 911 dipstick in its original location as I use the electronic dipstick exclusively.
 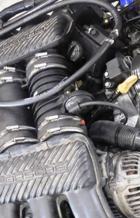 Without the Motorsport oil separator, the Boxster dipstick could have been used. I also modified and reused the 911 oil filler for the same reason.
If you had a street car, it would be time to remount the air conditioning compressor and install the accessory belt. For me the next task was to load the car back onto the trailer. I didn’t get too far as the headers caught on the leading edge of the trailer. The next picture shows the dented header.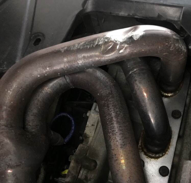 There are two issues. First the cylinder heads are physically larger (not by much) on the 5-chain 996 3.6L engine so the headers hang down a little lower. The bigger issue is dropping the engine ¾” is NOT going to work on a race car that has been substantially lowered to begin with.
Back under the car with the lift table. I loosened the front motor mount and removed the spacers. However it was hitting preventing it from going all the way up. On all M96 and M97 engines, the passenger side cylinder head and intake manifold sit further towards the front of the car than the driver’s side. 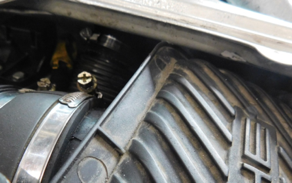 The picture below shows exactly where it was hitting on the front of the engine compartment.
For me the solution was to trim the manifold and the non-structural frame that supports the top cover to gain the needed clearance. 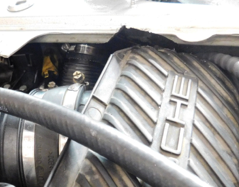 The picture shows the clearance before I lifted the engine that final ½”. The last piece of the puzzle was to source a set of headers that “hugged” cylinder heads more closely. Fabspeed makes a set for $1400 but I found these on Amazon that are also stainless steel for $104. The exhaust system is now tucked up tight and out of the line of fire.
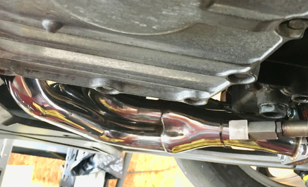 Except for adjusting of the shift cables a few times to get them just right, the car is was finished. It took 9 weeks but three of those were spent waiting for the transmission to be finished.
Final Product – 986 Boxster Porsche Could Have Produced
My 2600 lb. Boxster S track car now has 0-60 times that are around 4.5 seconds. This is awesome performance for the money and effort spent. On the track, the car doesn’t necessarily feel a lot faster, but it is easily 5-6 seconds a lap faster. There is no longer a need to downshift to 2nd gear to pull out of the slowest corners at MSR-H making it a lot more fun to drive. Top speed into turn 7 coming from Diamond’s Edge is 12-15 mph faster and it is proportionally faster at the end of the other straights.
In an autocross, the car is just bit faster primarily because it is limited by rear traction. Even so, lap times are about ¾ of a second faster.
Overall the car is 38 lb. heavier now but the extra power is great. At our first autocross, my son and I posted the two fastest times of the event so I am very happy with the car in its new configuration.
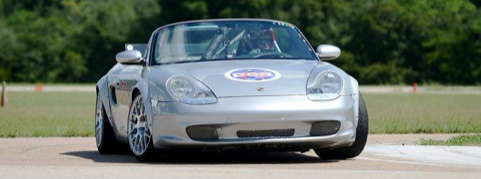
My first Autocross after the engine conversion.
 E-BRAKE NEWSROOM
- Porsche Gifted Us Four Must-See Videos About The History of Porsche and the Turbo December 31, 2024
- 1959 Convertible D, 1993 Porsche 968 Club Sport, 2023 Taycan GTS Sport Turismo, or 2024 718 Cayman? | Mart Fresh December 31, 2024
- DIY Oil Change Porsche 987.1 Boxster S | Save $$$ December 31, 2024
- 10 Tire Maintenance Tips For Porsche Owners | PCA Tech Tips December 24, 2024
- Carrera 3.2 vs 964 vs 993: Which one should you buy? December 24, 2024
- Special Porsche Tools That Every Dealer Uses | Tech Tactics Live December 21, 2024
- Did You Know That Senna Raced A Porsche? December 17, 2024
- Driving a REAL Porsche GT2! $1.24 MILLION!!! | PCA Spotlight December 17, 2024
- 1973 Porsche 914 2.0, 1987 944 Turbo, 2005 911 Carrera, or 2017 Macan Turbo? | Mart Fresh December 17, 2024
- What's My Porsche Worth in 2024? | Tech Tactics Live December 13, 2024
 Porsche Newsroom
- 50 Years on the fast track: Nardò Technical Center celebrates special anniversary July 1, 2025
- Stuttgart horse meets Luxembourg lion: unique 911 GT3 with Touring Package June 30, 2025
- Porsche customer team Rutronik Racing runner-up after 24-hour thriller June 29, 2025
- Victory and mid-season lead for BWT Lechner local heroes June 29, 2025
- Porsche customer team Rutronik Racing among the leaders at Spa June 29, 2025
- Dream start on home turf for BWT Lechner Racing June 28, 2025
- Eva Lys: “The grass in Wimbledon is the biggest challenge” June 28, 2025
- Best Porsche tackles the 24 Hours of Spa from fifth grid row June 27, 2025
- “Dialogue builds trust” June 27, 2025
- Four Porsche customer teams qualify for the Superpole session in Spa June 26, 2025


